
It's commonly known that for doughs and pastries, everything handles better when it's cold. That is one massive plus of this dough, when it's finished its first rise, it goes in the fridge to mature further - meaning when you take it out to bake, its fridge cold. This dough does not stick much and requires minimal dusting of flour to get it under control. It's a gorgeous dough to use. The recipe I'll give you is the "master" recipe, the plain and simple boule dough, the artisan free form loaf. The book has plenty of other variations, in fact, today I have a put a dough in that's a mix of dark rye flour, plain unbleached flour, and LSA - it's rising at the moment so stay tuned for how that one turns out!
Boule dough
3 cups lukewarm water
1.5 tbsp granulated yeast (2 packets)
1.5 tbsp course salt
6.5 cups unsifted, unbleached, all purpose white flour
Cornmeal for pizza peel
NB - I don't use corn meal and I don't have a pizza peel. I just use baking paper, some flour and a round, flat rimmed pizza tray.
Method
1) Warm the water slightly, it should feel just above body temperature. Warm water will rise the dough to the right point for storage in about 2 hours. You can use cold tap water and get an identical result but will take you 3-4 hours. It doesn't make much of a difference as you only do this once per stored batch.
2) Add yeast, water and salt to in a resealable lidded container (a pretty big one - I'm using a big pot at the moment!), don't worry about getting it all to dissolve.
3) Mix in the all the flour at once, kneading is unnecessary. Mix with a wooden spoon, the dough hook of your food processor until the mixture is uniform. You can use your hands if the spoon is difficult, just wet your hands and press the mixture together - don't knead! You're finished when everything is uniformly moist without dry patches. This step should be done in a couple of minutes, and will yield a dough that is wet and loose enough to conform to the shape of its container.
4) Cover with a lid (not airtight) and allow to rise at room temperature until it begins to collapse (or at least flattens on top), approx 2 hours (depending on the water/rooms temperature). Longer rising times, up to about 5 hours, will not harm the end result. You can use a portion of dough at any time after this period. Fully refrigerated dough is easier to work with than dough at room temperature, so the first time you use this method, it's best to refrigerate the dough overnight (at least 3 hours) before shaping a loaf.

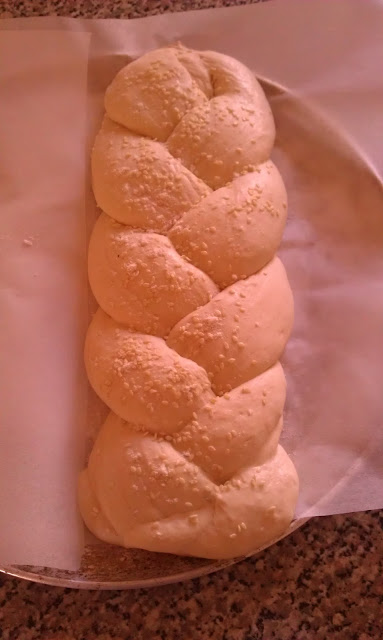
5) On baking day! Prepare your surface (pizza peel with corn meal, floured surface, baking paper - whatever you like as long as you can get the dough into the oven quickly and easily, as its hot!). Take about a grapefruit sized piece of dough from the container in your fridge and put it on your prepared surface. Sprinkle the surface of your dough with flour and shape it (add flour as needed to stop it sticking) into a ball - you can see how to do this via THIS video. Place it on your baking sheet/pizza peel and let it rest for 40 minutes. Don't worry if the bottom of the dough appears to be a pile of rough ends, in the resting time it will relax and merge with the rest of the dough. You can also make other shapes like plaits or rings.
6) 20 minutes before baking preheat the oven to about 230C, with your marble stone in the middle, and an empty roasting tray/pan on the bottom shelf.
7) Dust your loaf lightly with flour and slash whatever pattern you like into your bread, using a serrated knife (a cross, tic tac toe, scallop). Get about a cup of water ready by the oven, and then take your dough to the oven and slide your dough with a quick flick of the wrist onto the marble stone. Pour the water into the roasting pan underneath your marble slab and shut the oven door to trap the steam (this helps the crust develop).

8) Bake for about 30 minutes until the crust is golden and the bottom of the loaf sounds hollow when tapped. The loaf should rise while cooking (oven spring) and you should have a crusty delicious loaf of bread!


